Saturday, April 01, 2006
Ultimate COREid XSL Customization Development Environment
Some people look at the vanilla COREid interface and make a quick decision that they don't like it, or that it's not what they hoped it to be. These people fail to recognize is that the original designers were only trying to deliver a functional starting point for all. The designers knew that they could not build to satisfy everyone's specific business cases.
But behind this vanilla first impression is flexibility and power that goes unrecognized by many customers. To access it, you need a web developer who is willing to tackle the reasonably short learning curve of XSL 1.0. It is a slightly different programming paradigm - but once you're there, it's quite simple.
These days, everyone is talking about Web 2.0 and AJAX. Well, there's nothing stopping you. If you want a GMail like experience backed by COREid Identity services, it is there for the taking.
If you are this web developer working to make your Identity interface do backflips, here is a recommended development set up that will help speed you on your way to success.
 The key to XSL development is the ability to iterate rapidy. This is the main reason that you should not do your customization work against a live COREid server. Even if you dial the stylesheet cache down to 1 you still lose time bumping the cached sheet with every change.
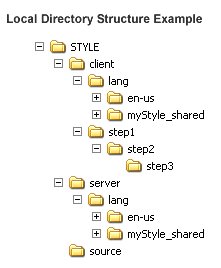
What you want to do is craft a representative development environment on your local machine. Here is what you need: Inside a root folder of your choice create three sub folders; client, server, source. From your WebPass installation copy the /identity/oblix/lang folder into the local 'client' folder. From the COREid Identity server installation copy the /identity/oblix/lang folder to the local 'server' folder. Also, under the local 'client' folder, create three more folders nested (step1/step2/step3). Now, capture some Presentation XML from the user stories that you are customizing and drop these files into the local 'source' folder. Take your XML editor of choice (we recommend Oxygen XML) and configure your transformation scenarios to output html into the local 'step3' folder. Finally, run a local webserver and configure it to allow directory browsing at the root of the 'client' folder. Now, after doing a transformation, you can browse to http://localhost/client (or whatever you called it...) and then navigate down to /step1/step2/step3/my.html and view your results.
With this structure intact, you should find that, not only is your iteration speed increased, but that you also have intact references to all images and client side JavaScript which enables development on this front as well.
Happy customizing!
But behind this vanilla first impression is flexibility and power that goes unrecognized by many customers. To access it, you need a web developer who is willing to tackle the reasonably short learning curve of XSL 1.0. It is a slightly different programming paradigm - but once you're there, it's quite simple.
These days, everyone is talking about Web 2.0 and AJAX. Well, there's nothing stopping you. If you want a GMail like experience backed by COREid Identity services, it is there for the taking.
If you are this web developer working to make your Identity interface do backflips, here is a recommended development set up that will help speed you on your way to success.
 The key to XSL development is the ability to iterate rapidy. This is the main reason that you should not do your customization work against a live COREid server. Even if you dial the stylesheet cache down to 1 you still lose time bumping the cached sheet with every change.
What you want to do is craft a representative development environment on your local machine. Here is what you need: Inside a root folder of your choice create three sub folders; client, server, source. From your WebPass installation copy the /identity/oblix/lang folder into the local 'client' folder. From the COREid Identity server installation copy the /identity/oblix/lang folder to the local 'server' folder. Also, under the local 'client' folder, create three more folders nested (step1/step2/step3). Now, capture some Presentation XML from the user stories that you are customizing and drop these files into the local 'source' folder. Take your XML editor of choice (we recommend Oxygen XML) and configure your transformation scenarios to output html into the local 'step3' folder. Finally, run a local webserver and configure it to allow directory browsing at the root of the 'client' folder. Now, after doing a transformation, you can browse to http://localhost/client (or whatever you called it...) and then navigate down to /step1/step2/step3/my.html and view your results.
With this structure intact, you should find that, not only is your iteration speed increased, but that you also have intact references to all images and client side JavaScript which enables development on this front as well.
Happy customizing!
Permalink posted by Mark Miller @ 9:44 a.m. 

![]()
